
Why Infrastructure-as-Code Matter to You, Even If You Are Not a Hotshot Developer
Tech
Skriven av Erik Lundevall-Zara
What is the deal with infrastructure-as-code, why does it matter to you?
Infrastructure-as-code, governance-as-code, and other “as-code” terms all deal with a set of desirable properties and outcomes. These properties and outcomes include getting consistent, reliable, repeatable solutions of some kind – with (relatively) fast feedback and delivery.
If you run business solutions at a cloud provider such as Amazon Werb Services (AWS), this will matter to you.
For infrastructure-as-code, this typically means to quickly and reliably set up and update (cloud-based) infrastructure. This infrastructure is the IT foundation that many business solutions depend on to run in a good way.
Thus it is a benefit to handle this consistently and reliably. If business expands or disaster strikes – also have the whole process repeatable and quick.
What as-code means
The term “as-code” in infrastructure-as-code may lead you to think it is about writing computer software to build infrastructure.
While this is certainly one way of doing it, the term “as-code” is a kind of abbreviation of “where we use good software engineering practices to produce great outcomes for the business.” But infrastructure-where-we-use-good-software-engineering-practices-to-produce-great-outcomes-for-the-business is a bit of a mouthful, so the short form “as-code” stuck instead…
What kind of good software engineering practices are we talking about here?
- Provide a human-readable and precise description, without ambiguity
- Keep track of changes in these descriptions, so we know what changed and who changed it
- Keep a version and release history of changes, with meaningful labels
- Allow us to see what state of the descriptions were at a specific time or associated with a specific label
- Be able to perform tests against an infrastructure description, to validate key elements of the descriptions
- Have computer software that can parse and execute the content of the infrastructure descriptions, to produce desirable outcomes
- An organizational structure that supports a way of working that fits with these concepts
Note here that only the second to last bullet point mentions computer software. Instead, it is mainly about practices that allow us to keep track of what we do efficiently. In addition, It is also about to allow the use of software tools to make this type of work more efficient, faster and eliminate human errors as much as possible.
One type of description I mention is certainly programming language code, as it has some desirable properties. But it does not have to be that.
For the most part, it will boil down to a textual infrastructure description, since this is something both humans and computer software tools may handle reasonably well.
Another vital part, sometimes overlooked, is that working with these tools and processes needs to be supported by the way people work and organize. If not, it is going to become messy no matter what.

What tools to use with as-code solutions
A vital tool is a version control system (VCS). It is also called a software configuration management (SCM) tool. Today, the most popular tool in this space is probably git, but there are many other tools also. Multiple hosting services can help you store and manage data using git – three prominent ones are Github, Gitlab, and Bitbucket.
Any tool that can create and edit text is valid to write the infrastructure descriptions. These tools could be anything from Notepad on Windows to more advanced tools, such as Jetbrains Intellij IDEA.
A useful set of tools that comes up a lot are those associated with Docker, which is a way to package (application) software to be provisioned to the infrastructure.
Tools to describe my infrastructure
Vital tools to work with infrastructure-as-code are the tools that understand the infrastructure descriptions. The examples here focus on Amazon Web Services (AWS) cloud infrastructure. Tools such as Terraform, Pulumi, and CDKTF work with other providers also. Common tools include AWS Cloudformation and Terraform, which uses textual configuration descriptions to describe the infrastructure. These can go into quite a bit of detail, which means they are very versatile. However, these tools can also get complex to use.
Simpler tools include AWS Copilot and AWS AppRunner. These tools focus on a more limited set of use cases for cloud infrastructure, but on the other hand, they are also overall simpler to use.
We also have tools that involve actual programming language code, such as AWS Cloud Development Kit (AWS CDK), Pulumi, and Cloud Development Kit for Terraform (CDKTF). All these allow infrastructure to be defined and described using programming languages. For developers who are used to coding, this can be great.

What tools should I pick?
I would argue that for the tools that describe the infrastructure, there may be four groups of people:
- Developers, who only want to care about application solutions, not the infrastructure it uses
- Developers, who want to care about the infrastructure
- Operations and sysadmins people, who care about the infrastructure, and does not consider themselves developers
- Other people
If you have people that fit all bullet points, you could pick any of these tools. The CDK + Pulumi tools should have some persons that fit the developer-who-cares-about-infrastructure to be a good choice. They can provide support for the other groups using these tools.
Operations and sysadmins people may consider AWS Cloudformation and Terraform as options, unless they want to dive into learning programming more in-depth.
Developers who mainly want to focus on application solutions may be served better by AWS AppRunner and AWS Copilot if they do not have the support from other groups – if their use cases fit these tools. This is probably the starting point for the “other people” group also if the other groups are not there to support them. However, there is still a need to understand the application software to run, so the “other” group will need some additional support – or prepare to learn some of the skills of the other groups.
What to do next
Start with tutorials for the simpler tools, like AWS AppRunner or AWS Copilot – the latter can even deploy AppRunner solutions as well. Pick a hosting service for version control system software, and get familiar with it. I would suggest starting with Github, even if this is not what you will use in the end. Github is the largest hosting service on the market, so there is plenty of example for it. Plus, you can sign up for free and use it.
Read more articles written by Erik Lundevall-Zara here.
Missa ingenting.
Prenumerera på vårt nyhetsbrev. Vi lovar att bara skicka relevant information och aldrig spamma dig.

My Morning Routine - How Successful People Start Every Day
Tech
Skriven av Erik Svensson. Inspirerad av Benjamin Spall and Michael Xander.
Stapplar du dig ur sängen på morgonen och känner dig överväldigad inför dagen framför dig?
Detta är inget bra sätt att starta en morgon om man ska lita på Benjamin Spall och Michael Xander, författarna av denna bok. Deras forskning visar att en målmedveten och omsorgsfull morgon gör dig redo för dagen framför dig. Förutom förslag på användbara morgonritualer tas även tips från framgångsrika människor såsom OS-medaljörer och VD:ar i framgångsrika bolag upp för att ge inspiration till att utveckla din egen rutin.
One-size-fits-(almost)-all
Att stressa igenom de första timmarna på morgonen hjälper dig inte att möta dagens utmaningar, så långt är vi nog alla överens.
En morgonrutin kommer inte i en one-size-fits-all. Vad som funkar för en annan kanske inte är rätt för dig. Ditt jobb, din personliga rytm eller om du har barn styr hur du startar din dag och hur du kommer att möta dina dagliga sysslor eller inte.
Kort och gott: den första timmen på dagen, när den nu inträffar, sätter tonen för resten av dagen.
Att snooza eller inte snooza
Om du är en av dem som ej klarar av att vakna tidigt för att utföra dina viktigaste sysslor innan dagen startar så rekommenderar då författarna att steg för steg nå ditt mål för att ge rum för just detta. Ställ väckarklockan fem minuter tidigare varje vecka och upprepa detta tills du har tid att utföra din tänkta morgonrutin.
– För att tala om motsatsen till denna teknik så gäller det självklart det gamla(?) ordspråket: “you snooze you lose” – genom att använda denna funktion på ens väckarklocka så blir man garanterat mer trött och seg än första gången larmet går. Välj alltså hellre att ställa klockan tidigare än att senarelägga ditt uppvaknande nästa gång.
Skulle nu den inkrementella taktiken fallera eller frestelsen för snooze ta över finns det två enkla sätt som garanterar ett tidigt vaknade. Skaffa barn eller hund – eller varför inte båda?

Att göra-lista
De av oss som kategoriserar sig som morgonmänniskor tycker att de arbetar mest produktivt under dygnets första timmar. Oavsett om du hör till den gruppen eller inte ska denna tid alltid präglas av fokus och en klar intention.
Skapa en att göra-lista på kvällen inför morgonen därpå. Genom att skriva ner saker så frigör du minnet (tänk datorns motsvarighet – RAM) och kan på så sätt slippa tänka på vad som ska göras härnäst. Författarna rekommenderar vidare att begränsa denna lista till 5-6 saker. Välj de mest kritiska sakerna att göra först och senarelägg mindre tankekrävande uppgifter såsom planering av telefonsamtal och möten till senare på dagen.
– Här kan jag själv rekommendera Google tasks som fungerat utmärkt för mig. Jag får möjlighet att se mina uppgifter i både mobilen och datorn men även att enkelt skriva ned saker så fort de kommer upp i tankarna. Perfekt för bland annat kundmöten och när man är ute på uppdrag!
Att inleda morgonen med att kolla mejl är generellt ingen god idé. Detta överlåter din kontroll till att i stället besvara andra personers frågor och behov. Däremot väljer Rafael Reif, presidenten för MIT, att göra motsatsen och menar att detta låter honom svara på viktiga meddelanden som kommit in under natten genom att snabbt kolla igenom sin inkorg. Meningarna går således isär men så länge vi inte har en position med samma globala ansvar som Rafael så kan vi nog ägna vår morgonstund till att fokusera på oss själva – deal?
Svettig morgonrutin
Att lägga in ett träningspass i din morgonrutin är ett utmärkt val, vissa föredrar hellre att träna senare på dagen men återigen gäller det här att hitta något som passar ens egna dagliga schema. Håll dig till det som funkar för just dig menar författarna. Finessen med att välja ett träningspass i ens morgonrutin ger, oavsett dagens utmaningar, en bekväm känsla av att man säkrat sin träning för dagen och förhoppningsvis känns alla utmaningar under resten av dagen som en baggis.
Ytterligare ett förslag till din arsenal är meditation. Det förbättrar koncentrationen, höjer fokus och sänker stressen men hjälper dig även att sova bättre. Om du inte gillar den traditionella meditationen kan du även använda guidad meditation. Du kan också öva att vara närvarande när du exempelvis kokar vatten eller brygger kaffet och låta tankarna vila – genom att släppa annat för stunden ger du tankarna en paus och du får alla tänkbara fördelar som nämnts ovan, bra eller hur? Meditation kan ses som ett sätt att sätta problem i perspektiv och framhäva tacksamhet för allt som livet har att erbjuda.
Sugen på något nytt? Bli medlem i Developers Bays nätverk för frilansare idag! https://developersbay.se/frilansare/

Ordning och (o)reda
Alla har inte lediga kvällar, men om du brukar tillbringa kvällarna hemma välj då att använda tiden klokt i stället för att slötitta på TV. Vissa föredrar att arbeta på natten, men även om du är en nattuggla bör du använda en rutin innan läggdags, mer om detta i nästa stycke. Exempel på fördelaktiga rutiner kvällstid inkluderar: välja ut kläder för nästa dag, göra i ordning sina träningskläder, skriv att göra-listor i slutet av arbetsdagen och granska nästa dags schema.
– Här anser jag att det gäller att inte överväldiga sig själv, kollat enbart på nästa arbetsdag. Att vakna upp till ordning ger lugn, välj därför att städa upp innan du lägger dig och förbered kaffebryggare – om du jobbar hemifrån. Den tid du spenderar med att varva ner på kvällen öppnar möjligheter att fokusera de tysta morgontimmarna på saker som verkligen betyder något, mer om detta längre ned.
En god natts sömn
Något annat som också kanske känns självklart men som är värt att poängtera är vikten av en god natts sömn som ger energi för morgonrutiner och tillåter dig att maximera din dag. Hur uppnår man detta? Enkelt, genom att sova tillräckligt. Något som jag själv tummat på rejält – speciellt när det finns så mycket jobb man enkelt kan bränna av just på grund av tillgängligheten till telefonen – är att hålla sovrummet en digital frizon.
Jag är säker på att alla redan hört detta, men det blåa ljuset är boven i dramat. Den påverkar vår dygnsrytm (circadian rhythm) och aktiverar vår kropp då den misstar ljuset för dagsljus. Vill du läsa mer om detta så rekommenderar jag boken Why We Sleep av Matthew Walker. En bra milstolpe som kan underlätta är att hinna med “midnattståget” som författarna kallar det d.v.s. somna innan midnatt.
Laget före jaget
När familjen och främst barn kommer in i ekvationen är det lätt hänt att det tummas på rutinerna eller att de helt enkelt kastas bort totalt. För er med barn som läser detta så finns det mycket att vinna på att vakna innan barnen för värdefull egentid enligt författarna. När väl resterande familj vaknar så gäller även här en digital frizon. Hur många gånger har man inte hört föräldrarna säga att uppväxten av barn gick för fort – tänk då hur fort det går när även telefonen tävlar om din uppmärksamhet?
Om du inte redan är såld på detta kan det vara värt att nämna att bland annat en av Twitters medgrundare umgås med sina barn en timme innan jobbet – kanske är detta en rutin värd att prova?
Tillbaks på ruta ett
Varje morgon erbjuds möjligheten att påbörja ett oskrivet blad och även en nystart. Genom att just ta hand om dina egna behov innan allt annat på morgonen ger du dig lugnet som behövs för att kunna svara på dagens alla utmaningar. Din egentid på morgonens s.k. tysta timmar är både värdefull och bidrar också till ditt välmående.
– Här kan jag själv tycka att just tanken att få klart en riktigt klurig uppgift eller ett tungt träningspass innan dagens ens börjat för omgivningen är svårslagen. Det ger även ett försprång och det är inte helt ovanligt att dagens sysslor redan är färdiga innan lunch på grund av ett uppbyggt momentum.
Detta summerar boken “Morning Routines” men även fördelarna med just rutiner i ett bredare perspektiv. Avslutningsvis kommer här ett citat från Thomas Carlyle som sägs ha kopplingar till rutiner:
“A man without a goal is like a ship without a rudder.”
Glöm inte heller att bli medlem på https://developersbay.se/frilansare/ för att ta del av de senaste uppdragen som frilansare!
Hälsningar, Erik
Vill du veta mer om oss på Developers Bay?

How to use Azure Container Registry in Kubernetes
Tech
Written by Mehrdad Zandi
What is Azure Container Registry (ACR)
Azure Container Registry (ACR) is a private registry service for building, storing, and managing container images and related artifacts like as Dockerhub. ACR is used specially by Enterprises which don’t want to have their containers on a public share.
ACR comes in three pricing tiers: Basic, Standard, and Premium. The main difference between them is the amount of included storage and the number of webhooks you can use. Additionally, the premium tier supports geo-replication. This means that your images are still available when a data center goes down.
In this post, I will describe how to create ACR, how to upload images to ACR, and how to pull images from ACR by configuring your Microservice and Azure Kubernetes cluster to run them in your Kubernetes cluster.
Prerequisites
- A GitHub account. Create a free GitHub account, if you don’t already have one.
- An Azure DevOps organization and a project. Create a new organization and/or a new project, if you don’t already have one.
- An Azure account. Sign up for a free Azure account, if you don’t already have one.
Create Azure Container Registry in the Azure Portal
I have described in my post Azure Container Registry (ACR) , how to create and how to push image to ACR. You can create ACR by looking to this post.
Here I have created ACR with name: mehzanContainerRegistry with Resource Group: mehzanRSG, in Region: Sweden Central.
Pushing Image to ACR
You have two alternative to push image to ACR:
- Alternative 1: importing the image from Dockerhub.
- Alternative 2: uploading it from a CI/CD pipeline.
I am going to describe the both alternatives in this post
Alternative 1: Import Image from Dockerhub into ACR
To import the image, use the following Azure CLI commands: (run az login first and then az acr import ..)
The first line logs you into your Azure subscription and the second one takes the name of your ACR (name should be lowercase), the source image from Dockerhub, and the image name which will be created in ACR .
In here I have taken the productmicroservice image from my Dockerhub: docker.io/mehzan07. (Your image should be exist in the your Dockerhub, otherwise you can push it from your local).
If importing is succeeded then navigate to your ARC registry in the Azure portal and select Repositories, then you can see productmicroservice (as shown in the following figure). If you double click it shows tag: latest.
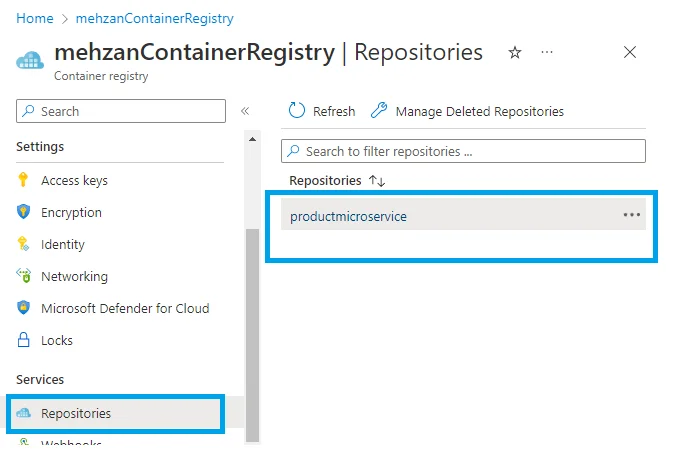 Importing Image: product microservice from Dockerhub to ACR
Create Azure Kubernetes Service (AKS)
You have to create an Azure Kubernetes Service (AKS), To Create AKS look to my post: Azure Kubernetes Service (AKS)
I have created AKS with name: microservice-aks with Resource group: mehzanRSG in Region: Sweden Central ( in the same Resource group and and same Region for ACR which I have created in this post).
Note: I haven’t create any Services and Progress yet, I shall create this later on.
Pulling Image from Azure Container Register to Kubernetes (aks)
To pull this image from kubernetes we should authorize Kubernetes to pull images from ACR.
Kubernetes is not authorized to pull the image. This is because ACR is a private container registry and you have to give Kubernetes permission to pull the images.
Allowing Kubernetes to pull ACR Images
To allow Kubernetes to pull images from ACR, you first have to create a service principal and give it the acrpull role.
Service principals define who can access the application, and what resources the application can access. A service principal is created in each tenant where the application is used, and references the globally unique application object. The tenant secures the service principal sign-in and access to resources. For more about Service Principal.
Use the following bash script to create the service principal and assign it the acrpull role.
1- Run the following script on Azure CLi command (start from portal):
Where the mehzancontainerregisry is the ACR name which we have created in the beginning of this post.
Note: If running of copy of this script is not worked then you should first copy and paste it to notepad and then take from there to run in the Azure CLI.
If it is succeed then output will be like as following:
Service principal ID: f8922aa7-81df-48a5-a8c6-5b158edb6072
Service principal password: oDm8Q~eVBH-15mE25t3EIqyTt0pc87UWmhVURaIM
Save these Service principal ID and Service principal password: and use them in the next step (in the following).
2- Next, create an image pull secret with the following command in the command line:
where docker- server value (mehzancontainerregistry.azurecr.io) is ACR Service and it is created with creating of ACR in the beginning. namespace: as default, docker-username: the Service principal ID value and docker password f Service principal password value from the step 1.
If it succeed the output will be: “secret/acr-secret created “
namespace value can be found from Ks8: dashboard as shown in the following figure:

3- Use the Image Pull Secret in your Microservice (productmicroservice)
After the image pull secret was created, you have to tell your microservice to use it. I have used the values.yaml file (under charts:productmicroservice) for values, as following code:
I have build image and pushed to my dockerhub before importing of image. The Source code can be found in my Github.
If you used a different name for your secret in the kubectl create secret docker-registry, then you have to use your name instead of acr-secret.
4- Copy the following yaml in somewhere in your local machine and give a file name (like as : acr-secret.yml)
And run it in the following kubectlcommand as follow:
I have saved the script in acr-secret.yml in the path C:\Utvecklingprogram\Kubernetes\
And run it as following command line from my local machine
If it succeed the output shall be: pod/productmicroservice created
where name: productmicroservice is the pod name of productmicroservice in the kubernetes (shall be seen in KS8: dashboard) and containers: name: mehzancontainerregistry is the ContainerRegistry name we have created in Azure (the name should be lower case). The image: mehzancontainerregistry.azurecr.io/productmicroservice:latest is the image in the Container Registry Service from Azure which we have imported from my Dockerhub.
Test the pulling image from Kubernetes (aks).
Connect to the K8s dashboard (by starting Octant from your local machine) If you have not installed Octant look to the my post: azure-kubernetes-service-aks
Start Octant from your local machine(start menu) and click on the Workloads: Pods, the following shall be displayed:
 Pod: productmicroservice is pulling from ACR and Running.
Look to the Config and Storage: Secret:
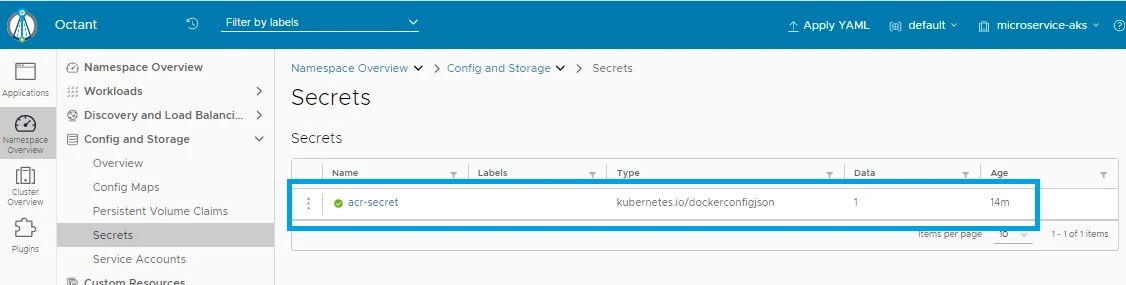
Config and Storage: Secrets: acr-secret is ok
As you see the acr-secret is created in your KS8 service.
Look to the Events:
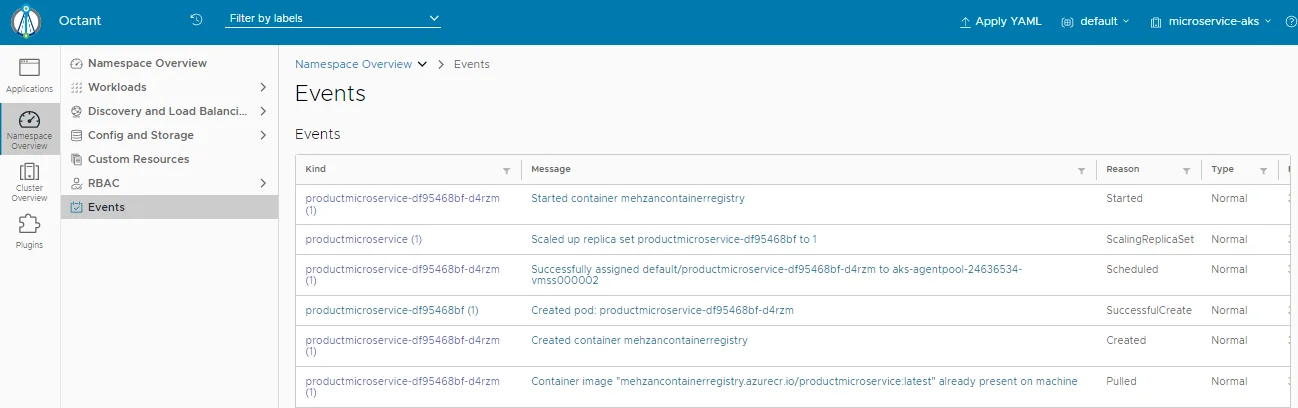
Event shows pod: productmicroservice is created
If we check the Services on the KS8: dashboard then we see this part is empty, because we have created only a kubernets (microservice-aks) without any “Service and Ingress”. Now we want to have Service and test application (productmicroservice). We can create Service And Ingress as described in my post: Azure Kubernetes Service (AKS) In the section: deploy the first Application.
Now go to the KS8 dashboard : Discovery and Load Balancing: Services then you can see that productmicroservice is created as following image:
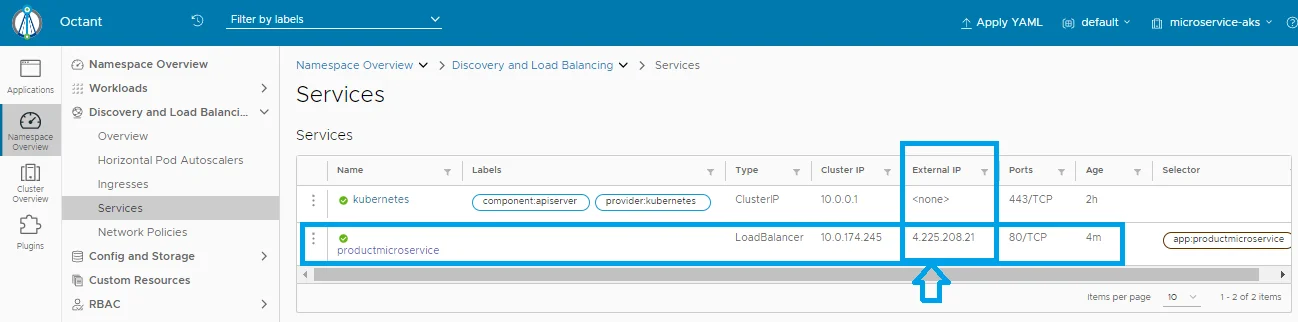
Service productmicroservice is created and has External IP: 4.225.208.21
Open browser with the external IP : 4.225.208.21, then the Swagger UI is displayed for ProductMicroservice as following:
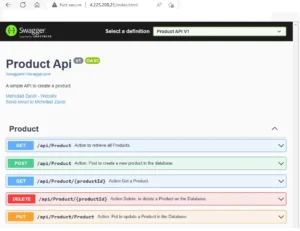
Swagger UI inj the productmicroservice: image pulled from ACR.
That is all.
We have created ACR, imported image from dockerhub, created AKS Service and configured, authorized to pull from ACR and tested it with KS8:dashboard.
In the end Cleanup all resources
When you are finished, delete all created resources in your Azure account. AKS creates three additional resource groups. Make sure to delete them too. Delete all resource groups.
Conclusion
In this post I have created an Azure Container Registry (ACR) in Azure Portal and Imported image from Dockerhub to ACR. Then I have created an Azure Kubernetes Service (AKS) and Authorized it to access to pull image from ACR. In the end I have tested it in KS8 dashboard (Helm octant), which shows the Swagger UI is uploaded from my application (ProductMicroservices).
All the Source code is on my GitHub.
Read about Alternative 2: Uploading Image to ACR from Azure DevOps Pipelines here.
About the author
Mehrdad is Consultant as System developer and Architect in Microsoft stack: .NET Platform, C#, , .NET Core, Micoroservices, Docker Containers, Azure, Kubernetes Service, DevOps , CI/CD, SQL Server, APIs, Websites, and more
In Frontend: HTML, JavaScript, CSS, jQuery, React, and more.
In addition I can build Websites by WordPress.

Vill du veta mer om oss på Developers Bay?

Setup a Terraform backend on S3 with AWS CloudFormation and CDK
Tech
Written by Renato Golia
Terraform is one of the most popular Infrastructure as Code (IaC) tools. Like other IaC tools, it lets you define a descriptive model of your cloud infrastructure and store it in one or more text files. This model describes the desired state of your infrastructure and can be used to reliably deploy, version and update your system.
It uses persisted state data to keep track of the resources it manages. Most production-grade configurations store this state data remotely allowing multiple people to access the state and work together. Also, remotely storing the state increase security because it avoids relying on the computer of the person working on the cloud infrastructure.
Since Terraform is cloud-agnostic, it supports storing the state data in many different ways. Terraform uses the term backend to refer to the system used to store the cloud resources state data and it supports many providers out-of-the-box. Among the many options, one can choose to leverage AWS to store the state data.
The backend using AWS requires an S3 bucket and, optionally, a DynamoDB table to enable state locking to avoid collisions between multiple actors.
We can use the AWS console to create these resources. Once done, we can instruct Terraform to use them by defining a backend element.
terraform {
    backend "s3" {
        bucket = "terraform-state"
        region = "eu-north-1"
        key = "path/to/terraform.tfstate"
        dynamodb_table = "terraform-state-lock"
    }
}
Now we can use the CLI tool to let Terraform initialize our backend.
$ terraform init
This will create in our bucket a file containing the state of the system represented in our Terraform application. Now, we can add resources and reliably deploy them in the cloud.
As usual, I’m skipping the authentication and authorization bits needed to deal with AWS.
So, everything works. We can create new applications and let Terraform take care of creating and configuring the resources and, most importantly, persist the state file in the shared bucket.
But the more I got used to Terraform or any other IaC tool, the more I got weary of that S3 bucket and DynamoDB table created via the console.

The Problem
Can we use Infrastructure as Code to define the infrastructure needed by Terraform to operate?
Short answer is yes. We can definitely use Terraform to define and deploy a S3 bucket and a DynamoDB table, as shown in this post by The Lazy Engineer.
This would define an infrastructure of a higher order. The problem is that we don’t have a backend for this application and we would be relying on tracking its state on our computer.
Staggered deployment
Looking for a solution, I found this blog post by Shi Han.
In his post, the author suggests using a staggered deployment approach. They first deploy the S3 bucket, then configure the backend to use it and then reconfigure the application to use the bucket to store the state of the bucket itself.
The name they give to the paragraph, The chicken-and-egg problem, is definitely fitting.
Even if it works correctly, I’m not really satisfied by this solution.
Shi Han’s solution is based on a trick that contraddicts one of the corner stones of Infrastructure as Code: your code files should be a valid representation of your system at any given time.
CloudFormation and CDK
How do you break a chicken-and-egg problem? You change the context. If Terraform can’t be used to set up the infrastructure it needs, we can look at other tools. At first I was looking at other backend providers to be used for our higher-order architecture but none of the alternatives caught my eye.
I eventually decided to leverage CloudFormation and its CDK (Cloud Development Kit).
While I am not enthusiastic about using two different techonologies (CloudFormation and Terraform) for the same job (i.e. describe my cloud infrastructure), I am happy enough because:
- CloudFormation is available to all AWS accounts, with no extra setup
- The CDK makes it easy enough to work with CloudFormation by hiding all its quirks
- I consider it acceptable to use different technologies for two different level of abstraction
Careful readers would be wondering if we really solved the chicken-and-egg problem. The answer is yes because CloudFormation takes care of persisting the state of the applications it manages (stacks in CloudFormation’s lingo) in resources already created.
So, let’s see how we can leverage the CDK to define and deploy the infrastructure needed by Terraform’s backend. Specifically, I’ll be writing a CDK application using the C# template.
Preparation
Let’s start by installing the required runtimes needed for working with CDK.
Let’s assume that the following tools have been installed and configured.
Once these are installed, let’s install the npm tool for CDK. We can then validate that the CDK CLI is correctly installed and configured.
$ npm install -g aws-cdk
$ cdk --version
2.51.1 (build 3d30cdb)
Finally, before we begin using CDK to deploy CloudFormation stacks, the CDK needs some required tools to be deployed on the receiving AWS account. This process is called bootstrapping.
# Bootstrap CDK for your account using `cdk bootstrap aws://ACCOUNT-NUMBER/REGION`
$ cdk bootstrap aws://123456789012/eu-north-1
You can read more about bootstrapping your account here
Now everything is ready for us to create our CDK app.
Creating the CDK app
Let’s create our CDK app.
We start creating a folder for the app, and then we use the CDK CLI to create an app based on the C# template.
$ mkdir TerraformBackend
$ cd TerraformBackend
$ cdk init app --language csharp
Once the template is generated, we have a .NET solution that can be customized to include the resources we need.
Customizing the stack
The solution contains a C# project with mainly two files:
Program.cscontains the code needed to initialize the CDK app.TerraformBackendStack.cscontains the class that we will use to add our resources
Let’s start by adding the resources to the TerraformBackendStack. To do so, we simply augment the internal constructor generated by the template.
internal TerraformBackendStack(Construct scope, string id, IStackProps props = null)
    : base(scope, id, props)
{
    var bucket = new Bucket(this, "terraform-state", new BucketProps
    {
        Versioned = true,
        Encryption = BucketEncryption.S3_MANAGED,
        BlockPublicAccess = BlockPublicAccess.BLOCK_ALL
    });

    var table = new Table(this, "terraform-state-lock", new TableProps
    {
        TableName = "terraform-state-lock",
        BillingMode = BillingMode.PROVISIONED,
        ReadCapacity = 10,
        WriteCapacity = 10,
        PartitionKey = new Attribute { Name = "LockID", Type = AttributeType.STRING }
    });

    new CfnOutput(this, "TerraformBucket", new CfnOutputProps
    {
        ExportName = "terraform-state-bucket-name",
        Value = bucket.BucketName
    });

    new CfnOutput(this, "TerraformTable", new CfnOutputProps
    {
        ExportName = "terraform-state-lock-table-name",
        Value = table.TableName
    });
}
In the snippet above, I add a S3 bucket whose name will be generated automatically by CloudFormation and a DynamoDB table.
Finally, I added two outputs so that I can easily fetch the name of the bucket and of the table.
Next, I change the Program so that the stack will be protected from any accidental termination that could be initiated by other actors or with a misclick in the Console. Finally, I make sure that all resources are tagged following my company’s policy.
var app = new App();
var stack = new TerraformBackendStack(app, "TerraformBackend", new StackProps
{
    TerminationProtection = true
});

Tags.Of(stack).Add("Project", "TerraformBackend");
Tags.Of(stack).Add("Environment", "Shared");

app.Synth();
With these changes, we’re ready to deploy our stack.
Deploying the stack
The CDK makes it very easy to deploy the stack.
From the root of our CDK project, we simply need to run cdk deploy to intiate the creation or update of the stack on CloudFormation.
When everything is complete, the CDK CLI will print the outputs that we defined in the TerraformBackendStack
$ cdk deploy
...
Outputs:
TerraformBackend.TerraformBucket = some-very-random-string
TerraformBackend.TerraformTable = terraform-state-lock
Now we can use the two output values to correctly initialize our Terraform applications.
terraform {
    backend "s3" {
        bucket = "some-very-random-string"
        region = "eu-north-1"
        key = "path/to/terraform.tfstate"
        dynamodb_table = "terraform-state-lock"
    }
}
Recap
Infrastructure as Code is becoming more and more of a mindset and we should strive to always follow it. Sometimes the tooling we use has limitations that could stop us.
Terraform’s support for backend infrastructure is one of the many examples. In this post, we explore how we can use AWS CloudFormation and its CDK to circumvent the issue and use IaC to create the infrastructure needed to work with IaC at non-trivial levels.
About the author
Renato is an expert in cloud-based distributed software architecture design and construction, with a focus on .NET and AWS. He has extensive experience in designing and building efficient CI/CD pipelines, as well as defining infrastructure-as-code blueprints.
Renato also has significant management experience, having previously served as CTO and leading a team. In addition to his professional work, Renato is dedicated to contributing to the open source community and developing .NET libraries to enhance developer productivity.
You can contact him on his personal blog, GitHub or LinkedIn

Vill du veta mer om oss på Developers Bay?

Analysis of AIOps – Guide For A Beginner
WHAT IS AIOps?
AIOps referred to as Artificial Intelligence for IT Operations is a term introduced by Gartner in 2016 relating to the category of Machine learning technology analytics which remediates Analytics of IT operations. Machine learning and big data are the 2 fundamental components of an AIOps system.
A comprehensive computational modeling and analytical approach is used to the integrated IT data to gather observational data and interactive data that can be obtained from a big data platform and necessitates a marked departure from sectionally segregated IT data.
Moreover, the objective is to facilitate IT development and obtain ongoing observations that, through automated processes, deliver ongoing corrections and advancements. According to this, AIOps can be thought of as CI/CD for essential IT operations.
BENEFITS OF AIOps:
FASTER MEAN TIME TO RESOLUTION (MTTR):
AIOps can detect fundamental problems and provide alternatives more quickly and correctly than individuals are expected. This results in a shorter mean time to resolution (MTTR). This allows companies to establish and attain MTTR goals that were previously unheard of.
REDUCED OPERATIONAL COST:
Reduced operational costs will enable efficient utilization of resources through the automatic detection of operational risks and modified reaction routines.
Additionally, it liberates staffing resources to concentrate on more complicated and creative projects, enhancing employee engagement.
MORE OVSERVALIBITY AND BETTER COLLABORATION:
Available integrations within AIOps monitoring tools facilitate more effective cross-team collaboration across DevOps, ITOps, governance, and security functions. Better visibility, communication, and transparency allow these teams to improve decision-making and respond to issues more quickly.
ADAPT YOUR MANAGEMENT STYLE FROM REACTIVE TO PROACTIVE, TO PREDICTIVE:
AIOps constantly learns to recognize and prioritize the most essential warnings thanks to its integrated predictive analytics capabilities, enabling IT teams to solve prospective issues before they cause slowdowns or disruptions.
AIOps USE CASES:
Output data, aggregation, analytics, algorithms, automation and orchestration, machine learning, and visualization are just a few of the different AI techniques combined in AIOps. The majority of such techniques are fairly developed and well-defined.
Log files, metrics and monitoring tools, help desk ticketing systems, and other sources provide AIOps data. Every one of the technologies’ information is gathered and arranged into a suitable format using big data technologies.
There are a few reasons to use AIOps which are discussed below:
NOISE REDUCTION:
Analytics tools can analyze the unprocessed data to provide new data and metadata. In addition to seeing themes and relationships that allow the software to discover and locate errors, estimate capacity demand, and manage various happenings, analytics reduces noise, that is unnecessary or misleading data.
ROOT CAUSE ANALYSIS:
The process of root cause technique helps to analyze the source of an issue or flaw. Finding the underlying source of the issue or incident is the root cause analysis’s main goal. Understanding how to completely resolve, make up for, or take advantage of any systemic causes inside the biggest reason is the major priority.
ANOMALY DETECTION:
AIOps systems can sift through a dataset’s unusual data points by searching through a lot of previous data. These anomalies serve as “signals” that pinpoint and foretell hazardous occurrences, like data breaches.
ACTIVATION of DevOps:
DevOps accelerates growth by granting development teams greater authority to set up and modify infrastructure, but IT must still take care of that infrastructure. In addition, without requiring a bunch of extra administration work, AIOps gives IT the insight and analytics it requires to enable DevOps.
Moreover, the unnecessary cost outcomes like poor PR, penalties from the government, and a drop in customer satisfaction.
In conclusion, for all types of businesses, AIOps is unquestionably transformational. Not only to increase IT operational effectiveness, but also for business expansion.
For more articles please visit our website
Vill du veta mer om oss på Developers Bay?

Running a GraphQL API in .NET 6 on AWS Lambda
Introduction
I recently set up a brand new API for a client. AWS and .NET were givens, the remaining choices were up to me. This article is my way of writing down all the things I wish I knew when I started that work. I assume you already know your way around .NET 6, C# 10, GraphQL and have your ~/.aws/credentials configured.
Why GraphQL
GraphQL has quickly become my primary choice when it comes to building most kinds of APIs for a number of reasons:
- Great frameworks available for a variety of programming languages
- Type safety and validation for both input and output is built-in (including client-side if using codegen)
- There are different interactive “swaggers” available, only much better
Something often mentioned about GraphQL is that the client can request only whatever fields it needs. In practice I find that a less convincing argument because most of us are usually developing our API for a single client anyway.
For the .NET platform my framework of choice is Hot Chocolate. It has great docs and can generate a GraphQL schema in runtime based on existing .NET types.
Why Lambda
Serverless is all the hype now. What attracts me most is the ease of deployment and the ability to dynamically scale based on load.
AWS Lambda is usually marketed (and used) as a way to run small isolated functions. Usually with 10 line Node.js examples. But it is so much more! I would argue it is the quickest and most flexible way to run any kind of API.
The only real serverless alternative on AWS is ECS on Fargate, but that comes with a ton of configuration and also requires you to run your code in Docker.
Initial application setup
We start by creating a new dotnet project:
dotnet new web -o MyApi && cd MyApi
Add AspNetCore and HotChocolate:
dotnet add package DotNetCore.AspNetCore --version "16.*"
dotnet add package HotChocolate.AspNetCore --version "12.*"
Add a single GraphQL field:
// Query.cs
using static System.Runtime.InteropServices.RuntimeInformation;

public class Query {
  public string SysInfo =>
    $"{FrameworkDescription} running on {RuntimeIdentifier}";
}
Set up our AspNetCore application (using the new minimal API):
// Program.cs
var builder = WebApplication.CreateBuilder(args);

builder.Services
  .AddGraphQLServer()
  .AddQueryType<Query>();

var app = builder.Build();

app.UseRouting();

app.UseEndpoints(endpoints =>
  endpoints.MapGraphQL());

await app.RunAsync();
Running locally
Let’s verify that our GraphQL API works locally.
Start the API:
dotnet run
Verify using curl:
curl "http://localhost:<YourPort>/graphql?query=%7B+sysInfo+%7D"
You should see a response similar to:
{ "data": { "sysInfo":".NET 6.0.1 running on osx.12-x64" } }
Lambda runtimes
AWS offers a number of different managed runtimes for Lambda, including .NET Core, Node, Python, Ruby, Java and Go. For .NET the latest supported version is .NET Core 3.1, which I think is too old to base new applications on.
.NET 6 was released a few months ago, so that’s what we’ll be using. There are two main alternatives for running on a newer runtime than what AWS provides out of the box:
- Running your Lambda in Docker
- Using a custom runtime
Running your Lambda in Docker was up until recently the easiest way for custom runtimes. The Dockerfile was only two or three lines and easy to understand. But I still feel it adds a complexity that isn’t always justified.
Therefore we will be using a custom runtime.
Using a custom runtime
There is a hidden gem available from AWS, and that is the Amazon.Lambda.AspNetCoreServer.Hosting nuget package. It’s hardly mentioned anywhere except in a few GitHub issues, and has a whopping 425 (!) downloads as I write this. But it’s in version 1.0.0 and should be stable.
Add it to the project:
dotnet add package Amazon.Lambda.AspNetCoreServer.Hosting --version "1.*"
Then add this:
// Program.cs

...

builder.Services

  .AddAWSLambdaHosting(LambdaEventSource.HttpApi);

...
The great thing about this (except it being a one-liner!) is that if the application is not running in Lambda, that method will do nothing! So we can continue and run our API locally as before.
Bootstrapping
There are two main ways of bootstrapping our Lambda function:
- Changing the assembly name to bootstrap
- Adding a shell script named bootstrap
Changing the assembly name to bootstrap could be done in our .csproj. Although it’s a seemingly harmless change, it tends to confuse developers and others when the “main” dll goes missing from the build output and an extensionless bootstrap file is present instead.
Therefore my preferred way is adding a shell script named bootstrap:
// bootstrap
#!/bin/bash

${LAMBDA_TASK_ROOT}/MyApi
LAMBDA_TASK_ROOT is an environment variable available when the Lambda is run on AWS.
We also need to reference this file in our .csproj to make sure it’s always published along with the rest of our code:
// MyApi.csproj
...
<ItemGroup>
  <Content Include="bootstrap">
    <CopyToOutputDirectory>Always</CopyToOutputDirectory>
  </Content>
</ItemGroup>
...
Creating the Lambda package
We will be using the dotnet lambda cli tool to package our application. (I find it has some advantages over a plain dotnet publish followed by zip.)
dotnet new tool-manifest
dotnet tool install amazon.lambda.tools --version "5.*"
I prefer to install tools like this locally. I believe global tools will eventually cause you to run into version conflicts.
We also add a default parameter to msbuild, so we don’t have to specify it on the command line.
// aws-lambda-tools-defaults.json
{
  "msbuild-parameters": "--self-contained true"
}
Building and packaging the application is done by
dotnet lambda package -o dist/MyApi.zip
Deploying to AWS
The way I prefer to deploy simple Lambdas is by using the Serverless framework.
(For an excellent comparison between different tools of this kind for serverless deployments on AWS, check out this post by Sebastian Bille.)
You might argue that Terraform has emerged as the de facto standard for IaC. I would tend to agree, but it comes with a cost in terms of complexity and state management. For simple setups like this, I still prefer the Serverless framework.
We add some basic configuration to our serverless.yml file:
// serverless.yml
service: myservice

provider:
  name: aws
  region: eu-west-2
  httpApi:
    payload: "2.0"
  lambdaHashingVersion: 20201221

functions:
  api:
    runtime: provided.al2
    package:
      artifact: dist/MyApi.zip
      individually: true
    handler: required-but-ignored
    events:
      - httpApi: "*"
Even though we are using AspNetCore, a Lambda is really just a function. AWS therefore requires an API Gateway in front of it. Serverless takes care of this for us. The combination of httpApi and 2.0 here means that we will use the new HTTP trigger of the API Gateway. This would be my preferred choice, as long as we don’t need some of the functionality still only present in the older REST trigger.
runtime: provided.al2 means we will use the custom runtime based on Amazon Linux 2.
Now we are finally ready to deploy our Lambda!
npx serverless@^2.70 deploy
The output should look something like this:
...
endpoints:
  ANY - https://ynop5r4gx2.execute-api.eu-west-2.amazonaws.com
...
Here you’ll find the URL where our Lambda can be reached. Let’s call this <YourUrl>.
Calling the Lambda
Using curl:
curl "https://<YourUrl>/graphql?query=%7B+sysInfo+%7D"
You should see a response similar to:
{ "data": { "sysInfo":".NET 6.0.1 running on amzn.2-x64" } }Cleaning up
Unless you want to keep our Lambda running, you can remove all deployed AWS resources with:
npx serverless@^2.70 remove
Bonus: Running on ARM
AWS recently announced the possibility to run Lambda on the new ARM-based Graviton2 CPU. It’s marketed as faster and cheaper. Note that ARM-based Lambdas are not yet available in all AWS regions and that they might not work with pre-compiled x86/x64 dependencies.
If we want to run on Graviton2 a few small changes are necessary:
- Compiling for ARM
- Configuring Lambda for ARM
- Add additional packages for ARM
Compiling for ARM
Here we need to add our runtime target for the dotnet lambda tool to pick up:
// aws-lambda-tools-defaults.json
{
  "msbuild-parameters":
    "--self-contained true --runtime linux-arm64"
}
Configure Lambda for ARM
We need to specify the architecture of the Lambda function:
// serverless.yml
functions:
  api:
    ...
    architecture: arm64
    ...
Adding additional packages for ARM
According to this GitHub issue we need to add and configure an additional package when running a custom runtime on ARM:
// MyApi.csproj
...
<ItemGroup>
  <RuntimeHostConfigurationOption
    Include="System.Globalization.AppLocalIcu"
    Value="68.2.0.9"/>
  <PackageReference
    Include="Microsoft.ICU.ICU4C.Runtime"
    Version="68.2.0.9"/>
</ItemGroup>
...
When adding this the API stops working on non-ARM platforms though. A more portable solution is to use a condition on the ItemGroup, like this:
// MyApi.csproj
...
<ItemGroup Condition="'$(RuntimeIdentifier)' == 'linux-arm64'">
  <RuntimeHostConfigurationOption
    Include="System.Globalization.AppLocalIcu"
    Value="68.2.0.9"/>
  <PackageReference
    Include="Microsoft.ICU.ICU4C.Runtime"
    Version="68.2.0.9"/>
</ItemGroup>
...
Building, deploying, and calling it once more
Build and deploy as before.
Call the Lambda as before.
You should see a response similar to:
{ "data": { "sysInfo":".NET 6.0.1 running on amzn.2-arm64" } }
confirming that we are now running on ARM!
Clean up as before.
Summary
That’s it! We have now deployed a minimal serverless GraphQL API in .NET 6 on AWS Lambda. Full working code is available at GitHub.
Opinionated take aways:
- Use GraphQL for most APIs
- Use Hot Chocolate for GraphQL on .NET
- Use Lambda for entire APIs, not just simple functions
- Use dotnet lambda cli tool for packaging
- Use Amazon.Lambda.AspNetCoreServer.Hosting for custom runtimes
- Use a simple bootstrap script to start the API
- Use Serverless framework for deployment
- Use ARM if you can
Any comments or questions are welcome!

Author – Magnus Markling, Freelance Cloud Architect
Vill du veta mer om oss på Developers Bay?

A Look at Swift's New Concurrency System
Swift’s new concurrency system has been on all Swift developers’ lips since its introduction at WWDC 21. The new model brings (among other things) the well-known async/await syntax pattern into Swift, making it possible to write asynchronous code in a linear fashion. It also improves how the scheduler prioritizes work items, reducing overhead costs associated with the previous concurrency system. But how does it differ from Grand Central Dispatch (GCD), and what problems does it solve?
Concurrency in GCD
Both Swift and Objective-C developers know GCD, which organizes work using First-In-First-Out (FIFO) queues. These queues could either be serial or concurrent. The former would execute a work item and wait for it to finish before dequeuing the next in line, while the latter keeps dequeuing work items as long as it’s not empty and there are available threads. This approach to concurrent queues incidentally leads us to one of the significant drawbacks of GCD, which we will explore with the help of a theoretical scenario.
Handling of Threads
A concurrent queue runs on a two-core system with three enqueued tasks. It will dequeue two items and assign them each to a thread, leaving one waiting. Imagine that one of the running items needs to wait for some resource, like a lock. It gets suspended while waiting, and one core is now available to perform other work. At this point, GCD will spin up another thread to service the remaining item on the queue.
In a contrived example such as this, the number of threads will not become an issue. However, modern applications might schedule hundreds of concurrent tasks, possibly leading to a phenomenon called “thread explosion.” Whenever a core starts servicing a new thread, it needs to perform a context switch, replacing stacks and kernel data structures. These switches can incur noticeable performance costs if many threads need to time-share the available hardware.
Priority Inversion
Apart from the above, GCD also suffers a more subtle performance drawback. Working with FIFO queues means that GCD prioritizes work in a suboptimal way. Say that four low-priority tasks are sitting in a queue when adding a high-priority item. Rather than letting the new task cut in line, GCD raises the priority of every item in front of it. Figure 1 shows a visualization of this principle at work, which causes the system to service less critical tasks as if they were vital.

Swift Concurrency
Now we know the most common pitfalls of GCD. The real question is whether Swift Concurrency does anything different. Does it solve the problems related to GCD? If so, do other challenges arise? Let us have a look!
Cooperative Thread Pool
Swift Concurrency works with a cooperative thread pool, meaning that the system actively tries to match the number of threads to the number of available cores. This approach eliminates the issues related to thread explosion, but they require a different approach to dispatch work items.
Instead of using the same work items that GCD uses, Swift concurrency uses a construct called a “continuation” for asynchronous code. It stores all information needed to suspend and resume an individual task, pushing the suspension point down the hierarchy. This structure means that when a particular method needs to wait for a resource, the thread can pick up another task instead.
Scheduler Optimizations
Swift Concurrency works with task trees instead of queues, giving the scheduler a better chance of prioritizing work. If several tasks wait for processing time, the scheduler can choose the most critical ones when threads become available. This property mitigates the challenges with priority inversion that GCD shows and makes the execution more efficient.
Pitfalls
Even though this post brings up what Swift Concurrency does well, there are also things that we need to take extra care of. Since GCD suspends an entire thread, holding a lock across a suspension point might not do any damage. Unless there is a deadlock, it will continue executing and unlock the resource at some finite point in time. However, the new concurrency system does not do well with locks held across suspension points. Since any arbitrary thread can resume the task, it may not release the lock when it picks up again. Therefore, it is crucial to think about how we use instances of, for example, NSLock and os_unfair_lock.
Wrapping Up
Swift’s new concurrency system brings a lot of new and very welcome features to the language. Given how it handles scheduling and execution of work items, it could give many multithreaded applications a performance boost.

Author – Jimmy M Andersson
A software engineer with a flair for the Swift language. He develops and maintains the open-source library StatKit – a collection of statistical analysis tools for Swift developers. He is also the author of “Statistical Analysis with Swift,” publ
ished on Apress Media.
LinkedIn: https://www.

11 years of Android: A brief history of time
Hello dear reader. My name is Ivan and I did 11 years of Android so you don’t have to!
Yes, this is a cautionary tale for any young mind foolish enough to venture into the dark depths of the tech industry. It is a personal story full of excitement and wonder, ups and downs, struggles and breakthroughs, trials and errors, exaggeration and oversimplifications for your entertainment. It is also filled with domain specific engineering jargon like: domain specific, context leaks, if (!isAdded()) return, crippling anxiety, coroutine exception scavenger hunt, screen orientation lock,…
From what you’ve read so far, you might assume that I dislike Android. That is not the case. It would be silly to spend 33% of my entire and 100% of my adult life working on something I don’t like.
I do like Android, in fact. It made me how I am today. It allowed my financial freedom and mobility. It allowed me to work with amazingly brilliant people on awesome ideas. I’ve traveled, advocated, started, failed, learned, managed, led, created, connected thanks to Android.
But, we have to be real: Android development is not great!
It never has been. It may never be. Sure, it has gotten better lately, but it is not the prince that was promised. It is just a John Snow.
 My bet is on Bitcoin now.
To walk you through my bold claim, I would match my subjective experience with Android to the historical periods of human development, starting from prehistory all the way to the present post truth era. Brace yourselves for a brief history of time:
The Prehistory
Yes, you read it right, prehistory. You may not be personally aware of this, but we are on the exponential curve of development heading straight towards singularity. So many things have happened in recent years, 11 years ago does seem like prehistory. Few hundred years ago, if your father was carpenter, chances were you would be one too (under the assumption that you managed to survive your childhood). Nowadays, if you choose one framework, chances are in 12 months you would need to refactor everything. *coughs* RxJava *coughs*. Except for Fragments of course. They are here to stay. Like the appendix in our body, Fragments are laying dormant, waiting for someone to restore the instance state or pop the back stack and wreck some havoc.
Little is know about prehistory. The tools we used were made from wood, they did not survive the elements, they decomposed over time. What we can recall is from the paintings on the walls of the deepest caves. The Activities were the deities, the God classes, containing all logic, leaking contexts left and right. Things that give modern developers a mini heart attack today were common back then. Manual network requests, manual image loading and caching, network on main thread, yes, network on main thread, dreadfully slow and unusable emulator, trackballs, hardware keys, jars, Eclipse IDE, svn, SOAP. Simple Object Acquisition Protocol. Oh my, what a misleading name. The person that made this up sure had the last laugh.

Indeed a time of great hardship, but also a time of great freedom. No design guidelines, zero requirements for publishing on Android Market (yes, Google Play was called Android Market once), no libraries to tell you to initialize them in the Application class, no doze mode, no limits to background execution, no data to process, no stack traces to analyze. The path to greatness was straightforward, you just copy the first answer from Stack Overflow, you don’t really need to understand what attachToRoot parameter means during layout inflation.
The Ancient History
Ancient History, referred also as the Classical Period, named after the emergence of the classical Android problem: fragmentation. Every person in the world with a stable internet connection downloaded the AOSP code and made their own version of Android. You want Hello Kitty icons? You got it! HTC UI on a ZTE device? Why not! An ad blocker with root privileges? Yes sir! Oh, the Bluetooth is not working, the camera only captures portrait and there is a high possibility for bricking? No worries, the cyan Android is worth all that.
![]()
Tiny civilizations formed around these early attempts of consolidation, each with their own similar, yet distinct culture. The platform was maturing, the Contexts in the AsyncTasks were being wrapped in WeakReferences. JSON was the language most servers could speak. Git became the one version control system to rule them all. Steve Jobs unleashed an oversized phone (that would later on be referred as tablet) which made development needlessly more complex. Whispers traveled from the far East about an exotic IDE and a new build system that will make development a breeze. No more jars, no more ants.
Language evolved as well. People started talking about and partially understood the previously unheard topics of ViewHolders, Fragments, Tablets, Holo Themes, SherlockActionBars, Hamburger Menus. There are written evidence of Android apps that managed to look good while NOT being an exact copy of the iOS one, a groundbreaking progress made by early design pioneers and courageous explorers.
While there were sparks of civilizations here and there and the future looked bright (ex. Instagram just got ported to Android), keep in mind these were still barbaric times, a wild free for all with little structure, excessive wake locks, permanent background processes and massive battery drainages.
The Dark Ages
At this point of history, Android became the weapon of choice for the masses, offering a wide variety of mostly functioning low/mid end devices. Blackberry was moved to museums next to where the dinosaurs were kept and while still early for a full on flagship battle with iOS, the ecosystem provided everything you would need from a smart phone for a price that would not require your parents to get a short term, high interest loan for you to look cool. It may sound silly today, but these were times when iOS vs. Android rivalry was taken quite seriously.

According a scientific census that I made up for the purpose of this article, the dark ages officially began when the first production app hit the 64K methods in a single DEX file limit. This signalled that the limits of the intended platform usage have been reached and now fragmentation is running amok. This, together with few other cataclysmic events like Samsung consolidating a large chunk of the market with the worst phone in the history of phones – S3, brought upon the dark ages.

Google did their best to fix the leakages, address the platform bugs, force OEMs to push OTA updates of their OS (if you don’t know what these abbreviations mean, just read forward and save yourself a google search) and provide useful APIs and guidelines to developers, but to avail. The manufacturers were slow to react, Views were filled with if-else branches for handling device/platform specific bugs and 3rd party libraries were using AlarmManagers to upload entire phonebooks, call logs and messages to their servers while you were sleeping.
Development felt more like trial and error, patch and ship than a structured approach. It still took three Hail Mary’s and a process death to start up the emulator (hello Genymotion), build speeds slowly deteriorated and up until this day they never fully recovered. It became a common practice development teams to have dummy projects that compile within reasonable times, develop features and especially UI there, then just copy paste them to the main project. It did also not help that Google was pushing for the worst API ever created for Android – Loaders to compete with already terrible ones like AsyncTask, ContentProvider, ContentResolver, ListView, RecyclerView (View in general for that manner), Camera, Bluetooth, Resources, Styling, Theming, Keyboard,…
The Renaissance
Regardless of how dark it gets, human ingenuity will never let darkness prevail. The Renaissance, the great awakening, the age of enlightenment started when Google figured out that you don’t really need to wait for device manufactures to push fixes updates to their users, they can delegate that responsibility to the developers. Thus, the support libraries were born, a massive overhead of code and complexity that you need to include and maintain in your project to patch an OS that cannot update fast enough to compete with Apple.
This forward thinking started rolling the ball forward and brought even forwarder thinking. Just like the great renaissance Renaissance painters that drew inspiration from Ancient Greek culture, Android developers wondered what can be learned by studying ancient cultures. Was there any wisdom hidden in backend or web development? Did they know something we had forgotten?
It turned out there was! For example, you can actually organize your code, not just stuff everything inside an Activity or a Fragment. By doing so, you can split the presentation from the domain layer and even test them separately.
I did not believe it when I first heard it. Writing your code in a way that is testable and reusable seemed wasteful. What was next, writing your tests first, then writing your code? Heresy! I wanted none of that.
But, just like in human history, science prevailed. Uncle Bob figured it out. It turned out that the MV(C/P/VM/I) is a good way to organize your code and all the boilerplate is just worth it. Sure you would copy and paste the same thing in dozens of different files for a while, but it is a matter of time until someone writes an annotation processor or a command line tool that will generate this for you, confusing the Gradle build system and setting you on a google search quest that will ultimately lead to deleting the build folder, invalidating the cache and restarting the Android Studio.
Support libraries grew to become behemoths (remember when just including the GSM megalith pushed your app over the 64K limit), but also enabled creating better user experiences. Android was not the underdog anymore. An opportunity for taking the lead arose. For the first time in history Android became cool.
Of course, some forward thinking went too far. Reactive programming became a fad, but ultimately caused more problems that it solved. Same goes for any ORM libraries that tried to abstract out the limits of SQLite (hello Realm). Google also got excited and went ahead of themselves with Ahead Of Time compiling, Jack, Instant Run,… All these ideas were awesome in theory and received massive highlights during Google I/O events, but ultimately failed to deliver on the promise of making Android development great.
The Industrial Revolution
Once people find something that is working, they are amazing in scaling it up, iterating over it, finding more and more ways to squeeze every last drop, consolidating the market, removing the noise, silencing the competition. Enter the machine dear developer, rejoice! Gone are the days of you being stuck with a bug from a dependency because the repo maintainer went on a vacation and never came back. Gone are the days where you would have to rely on Jake Wharton‘s pet projects to find views by ids in a fancy manner. The capitalists took over. The old gods are dead. You will heed to what Google “recommends”.

Development was moved to the assembly line. It was not longer art and experimentation. It was no longer “we do what our introvert tech lead genius tells us to”. We now know what works: Kotlin + MVVM + Coroutines + the full Google suite of support libraries and services. You inject stuff now. Inversion of control or something. You don’t need backend even, you have Firebase that cost practically nothing under the assumption that you excessively duplicate and nest your data to avoid multiple queries. Everything is documented and everything works as intended except when it doesn’t.
You don’t even need to think, the Android Studio new project wizard generates all the boilerplate for you, sets up the navigation, the annotation processors that never affect your build speeds, decides what flavours to be built on your CI/CD build machines, it tracks every user action and reports their feedback in a Slack channel that the PO/tech/team lead needs to monitor to demonstrate to management that all that talk that branding and marketing came up with about caring for our users is actually true.
Sure, you still need to write Adapters and bind ViewHolders for your RecyclerViews like is 2010, you still have to guess if the keyboard is up or not, you still need to google on how Service can communicate with an Activity, you are still uncertain what library update will break the incremental compilation, forcing you to think that at this point the only thing that may reduce build speeds is Apple Silicon.
But, that is all fine. At least now you have social login out of the box, mature design system – Material with solid principles and extensive guidelines that everyone knows, except for some reason, your designer. That is not all, you also have streaming operations for lists and extension functions you can use to puzzle the junior developers as you chain your way to the most elegant piece of code you have ever written.
        viewModelScope.launch {
            firstFlow
                .zip(secondFlow) { first, second ->
                    first.takeIf { it.contains(second) }
                }
                .mapNotNull { it }
                .distinctUntilChanged()
                .collect { Log.i("TAG", it) }
        }
The Modern Times
People in the early 20th century envisioned the future as this bright, modern place with flying cars and Jetpack. No flying cars yet, but at least we have Jetpack now to fly us places. Showing late to the party, Android finally embraces declarative UI with Compose, hopefully just in time to prevent some young kids venturing into Flutter or god forbid React Native with their false promises of covering multiple mobile, web and desktop platforms with a single codebase, hot reloads, a simpler way to deal with UI, navigation, multithreading, theming, styling, animations,…

Updates nowadays are more incremental polishes than meaningful changes. Except for the top notch, that was a game changer, it triggered a movement of millions of developers spending at least few hours adapting their layouts to account for the brilliant stunt that Tim Cook and Jony Ive pulled to break the $1000 mark for a phone. Can wait for the $2000 mark for the foldable displays.
Edges alternate between square and rounded every season, because groundbreaking design progress happens once a decade or so. In between you go from AlertDialogs to BottomSheets, from Rose Pink to Crimson Blue. After more than a decade of maturing, UI or end-to-end flow testing is still not viable, the amount of effort that takes to setup and maintain is really not worth it, business wise is easier and/or more cost efficient to outsource and let people with names you struggle to pronounce to click through hundreds of test cases. You can use your precious developers time to round off that Toolbar, so your app does not look exactly like million others in existence.
The European Union with their concern for user’s privacy in collaboration with hackers interested in obtaining that privacy, shrank the limits of what you can you as a developer. Permission and consents pop up all the time, users promptly deny or ignore them, depriving companies from the much needed data, resulting in even a stronger push to get it by any means necessary.
And this is what modern times development is, tricking the users into giving up their data. It is less about solving a problem or providing a service and more about figuring out an ad placement that will yield +0.6% of revenue through a masterfully crafted A/B test. It is about integrating tracking libraries to segment your users and serve them personalized content based on a model that your data team trained and your backend delivered via Server Driven UI.
Modern times come with modern fancy tools, you can now monitor network, memory, CPU, object (de)allocation, memory leaks, query local databases, peek into the layout hierarchy, drag-and-drop constraints,… Still, most of the time you will not spend using them, but figuring out why they need plugging and unplugging the USB cable in order to work or something completely unrelated like why the horizontally scrolling nested RecyclerView within a vertically scrolling parent one does not retain the state upon orientation change.

The Future
If we 2012 and the Maya ever thought us anything, is that no one can really predict the future with great confidence.

Android has matured so much, that I can imagine being somewhat difficult for new developers to catch up. Activity/Fragment/Service lifecycles, Adapters and ViewHolders, FragmentManagers, ViewModels, LiveData, the complex topic of multithreading with the added spice of coroutines and of course, Flows can be quite overwhelming if you are just starting.
In my free time I play around with ReactNative and Flutter and I will now say something that myself from few years ago would never dare to say it: It is so much better! Not the best, these platforms still have some maturing to do, but much better.

And I can recommend these frameworks (with a preference towards Flutter, but this is personal) to people who would want to get into mobile development. It just makes more sense. Why limit yourself to just Android by learning Native when you can pretty much do the whole frontend with a single framework. Mobile, web, desktop and whatnot. Include few Firebase dependencies and you are full-stack now.
And as more and more beginners are starting with multi-platform, as more and more tech leads are pushing the idea to management that a full refactor is needed to sustain the business, as more and more complex use cases emerge, these frameworks will mature and not be just a great tool for pushing out MVPs to get series A round of funding and give up significant part of your start-up ownership to people that have more money that they can ever use.
Fear not, Android Native will not die out. There will be plenty of work for Native Android developers in the coming years. It still needs to exist in order to support the multi-platform, there are still specific use cases where multi-platform will not work yet (ex. IoT) and there are huge companies around the world that have invested in Native so much, that it will not be easy to switch to something else.
The OS will still exist, there are individuals and huge teams at Google, Android, Huawei that continuously contribute (albeit, on their own forks of the AOSP) and evolve the system to fit in many other places, not just your smart phone.

And there you have it, a brief history Android. A small glimpse of the evolution of a framework through my subjective experience.
If there is anything to be learned from all of this is that change is the only constant. Things change at such a fast pace that is practically impossible to try, catch (hehe) and learn them all. And that is perfectly fine. There is a joy of missing out, not just fear.
The wisdom I want to leave you with is not of a technological nature, but of a human one. Take it easy. Do not value yourself by how much frameworks you are proficient in, trends you follow, buzz words you know, libraries in alpha you have in your pet project, lines of code you push to your side hustle after work hours. Do not gamify your profession jumping from one achievement to another, comparing yourself with others under the pressure of being constantly productive.
Instead, value collaboration over competition. Find the value you are providing to your team, your company, your product and ultimately, the end user. The greatest challenges our industry faces are not from a technological nature, communication is the greatest friction point. How do I get in touch with my inner self, so I understand how I feel, begin to understand others, and develop the necessary skills to communicate this efficiently with the people I work with. Your career progress is much less dependant on what you know and can do, but on how well can you learn and incorporate that in a collaborative environment.
True progress happens in teams and organizations that have understanding for personal preferences, practice open, honest, non-violent communication and nurture an environment that encourages learning through inclusion, empowerment, exploration and experimentation. These are the key words every tech person should be learning. Android, iOS, Fuchsia, Native, Multi-platform are just tools, they do not manifest ideas by themselves. We do, and we do so by working together.
Ivan is a yogi mindful leader, principal software engineer, a multi-platform enthusiast with a passion to bring mindfulness into the tech world. A passion so great that he decided to quit his day job and start a company together with his wife that does exactly that.
Ivan also gives talks on how to become a better human by making small tweaks and incremental adjustments to your daily life, the agile way. His next talk is titled 27 tips and tricks for navigating the pandemics (or any other hardship) and if you are reading this before 18 May 2021, you should definitely register by following the link. Thanks for reading fellow human!

Ivan Dimoski
Freelancer and member of DevBay community
Vill du veta mer om oss på Developers Bay?

Time series classification – an overview
Time series classification (Fig. 1) is a relative late bloomer in the field of machine learning. However, in recent years there has been a real surge of data, algorithms and open source code that can be used to tackle problems in new and better ways.
This blog post aims to give a basic overview of the field. My aim is that it should be possible to follow for the interested reader even without a background in machine learning. Hopefully this will give you readers an overview and further avenues for explorations.
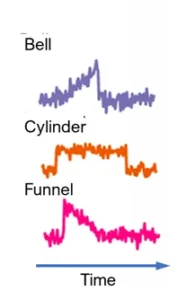
Fig. 1. Time series classification example. Samples from the widely used synthetic Cylinder-Bell-Funnel (CBF) benchmark dataset [1]. Each time series belongs to one of three classes: cylinders, bells and funnels. Adapted from [2] with permission from Patrick Schäfer.
Examples of time series and classification problems
A time series is just one (uni-dimensional) or several (multi-dimensional) temporally ordered sequences of numeric values. They are ubiquitous since anything numeric that you measure over time or in a sequence is a time series. For example:
- The temperature in Stockholm each day during 2020 (a uni-dimensional time series).
- Sales records
- Video (a multi-dimensional time series where each image corresponds to a time point. Note that here the data is also ordered in the pixel dimensions).
- Audio recordings.
- Internet-of-things and other sensor data.
- ECG/EEG and other medical signals.
- Transport data (e.g. when studying road congestion).
- The growth curve of a child (here the time points are not equally spaced, so this puts special demands on the algorithms).
Other types of data can also be viewed as/transformed into time series, such as written text, which is basically a time series but where the entities are not numeric. The beauty of this is that it lends the possibility to analyze time series using language models and to analyze language using time series models.
Time series classification problems are everywhere, so it is hard to know where to start, but the following are some random examples of making classifications from time series data:
- Classify of whom a voice recording is
- Classify an ECG as normal or give the type of abnormality.
- Surveillance: From a video, capture the path of an individual, then classify what he/she is doing.
- Internet-of-things: classify whether a kitchen device is malfunctioning.
- Speech recognition
- Classification of brain imaging or genetic expression data
You can imagine yourself that the applications of good algorithms are essentially without limit.
What is time series classification with machine learning?
In essence, time series classification is a type of supervised machine learning problem. Supervised problems have the following procedure: You get a set of time series, each with a class label. You typically divide the time series into three groups, the training data, the validation data and the test data. You train a number of algorithms/models on time series in the training data, observe which algorithm performs the best on the validation data and choose that one. Finally, you use the test data to determine the performance of the chosen algorithm.
The difference to many classification problems in machine learning is that the data is ordered along the time dimension, and as such a good algorithm would need to exploit this property of the data.
One should not confuse time series classification with forecasting. The purpose is different and hence the algorithms are, too. Forecasting aims to predict the next future values, and as such often relies more heavily on the end of a time series. It doesn’t need to compare different time series with each other. Rather it needs to find recurring patterns in data that are predictive of the (immediate) future. Classification on the other hand needs to find patterns in the data that are different between different classes in order to determine the class of the time series at hand.
So what are some of the algorithms used for time series classification?
Dynamic time warping, a benchmark algorithm
For at least a decade, a technique called dynamic time warping (DTW) combined with 1-nearest neighbor (1-NN) has been a benchmark for other time series classification algorithms to beat [3]. 1-nearest neighbor (Fig. 2) is a simple technique where you have a training set of time series [4]. You then classify a new incoming time series by finding the time series in the training data that is most similar, and assign the new time series to the same class as that one. You can also have k-nearest neighbors, where you find the k most similar time series and choose the most common class amongst those.

Fig. 2. 1-nearest neighbor. Based on a dataset of two classes (blue and yellow), a new datapoint (circle) is to be classified. By finding the nearest datapoint, the new datapoint can be classified as belonging to the yellow class.
DTW [5] is used to calculate the distance between two time series (Fig. 3); without a distance 1-NN cannot determine which time series is nearest. The most naive way would be to just take the distance between each point in the time series. However, it is not necessarily clear which points should be compared to which in the two time series. For instance, if two identical time series are just shifted slightly, then this would result in a big distance. DTW solves this by pairing up the different time points by drawing lines between them in such a way that each time point in a series must be connected to a time point in the other series, and two lines must never cross (Fig. 3). The distance is the sum of the difference between the paired time points. DTW chooses the grey lines in a way that minimizes this distance.
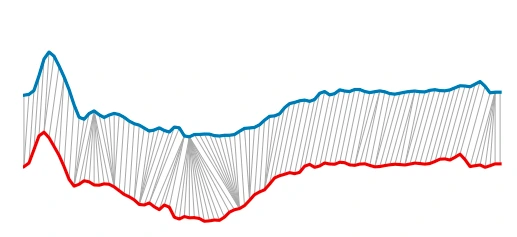
Fig 3. DTW. Points in two time series are connected in a way to minimize the distance between two time series (the combined length of all the grey lines). As can be seen from the gray lines being tilted, the latter half of the blue time series is shifted to the right of the latter part of the red time series. DTW is able to connect the corresponding points of the two series to calculate the minimum distance. Adapted from [6] with permission from Brian Iwana.
The benefits of a machine learning model
DTW+1-NN doesn’t build a machine learning model of what time series for a different class should look like. What I mean is, there is no model holding an internal representation of the world, no knowledge stored in any model weights. Instead it reaches its conclusions simply following a step-by-step procedure where it compares new time series to series in the training data. The benefit is that no model training is needed. But there are several drawbacks.
Firstly, classification takes a lot of time. For each new time series one must calculate the distance to all the time series in the training data. DTW is in itself an optimization problem, which means that the distance calculation is fairly slow, and for a big data set consisting of millions of data time series it must be repeated over and over again. Hence, it doesn’t scale beyond fairly small problems.
Secondly, a machine learning model is a way to capture our knowledge of data in a parsimonious way. For a real-life analogy, having a model is akin to having an expert at hand. The expert can just look at your new time series and say which class it belongs to. Training a human expert takes a long time, but once that is done, classification is fast. On the other hand, DTW+1-NN is like working with a non-expert given a recipe for how to go through the data and determine the class.
Having once captured your knowledge into a machine learning model means that you can employ this knowledge in many situations that are similar but not identical, a technique called transfer learning. For example, consider a model that has looked at many bird songs in order to separate between nightingales and canaries. In order to do so, it has had to learn many features of bird songs in general. If we now wanted to separate between a robin and a sparrow, we could use our previous model and just finetune it to hear the difference between these two species. This would be much easier than training a new model, because the old model has a good ear for bird songs in general already, so much less training data would be needed.
You might think that transfer learning would only be useful in obviously similar cases such as the above. Think again. Image classification has been a resounding success due to the availability of huge benchmark datasets of millions of images coupled with competitions that have driven the development of algorithms to beat previous records on those datasets [7, 8, 9]. Researchers have for some time now transformed one-dimensional time series into two-dimensional images using techniques such as gramian angular fields, and been able to classify these time series images successfully [10]. Think about how wild this is! The network has been studying photos of cars and airplanes and somehow learnt something useful for classifying bird songs. When I first heard that learning can transfer that far I was just blown away. The reason why this works is that there is some similarity on some level between the time series images and real images on which the network was first trained.
The above example is interesting from another aspect as well. We have a 2-D image model which is sub-optimal compared to a tailor-made 1-D time series model. However, since the image model has had much more training data, it performs better. It is the model-data combo that determines the performance, not the model in isolation.
Recent developments / Other approaches
Data availability
For time series, there exists a repository of datasets called UCR/UEA [1, 11] (from Univerisity of California, Riverside and University of East Anglia). It displays a wide variety of time series and all algorithms are benchmarked against it. In this way it is immensely useful in determining the relative performance of various algorithms. Compared to the corresponding benchmark repositories for images, text, etc, it suffers from being much smaller, having just on the order of 100 datasets, and with the biggest containing less than 10000 samples. For text, for example, you can download the whole of wikipedia very quickly. This comparative lack of data is hampering the development of the field. However, the repository is growing and being added upon every few years (most recently in 2018), which benefits research.
Perhaps due to relative lack of data, it has been difficult for new algorithms to beat DTW+1-NN, since more complex models would need more data to train all the parameters on. Below I describe some of the approaches that have performed better than DTW+1-NN.
Shapelets
One technique is to use shapelets [12]. A shapelet is a short time series that has been chosen because it is very indicative of a class (Fig. 4). For example, it could be a particular electrical pattern that is only emitted by microwave ovens and as such can be used when classifying home appliances. Shapelets are different from DTW because they focus on only parts of the time series. When you pass a time series through a shapelet algorithm the output is the minimum distance between the shapelet and all subsequences of the time series (this is called a shapelet transform). This data can then be used to train a classification algorithm, e.g. 1-NN or a machine learning model. In [13] an ensemble (see explanation below) of classifiers based on shapelet-transformed data was second best on the UCR/UEA dataset of all tested algorithms.
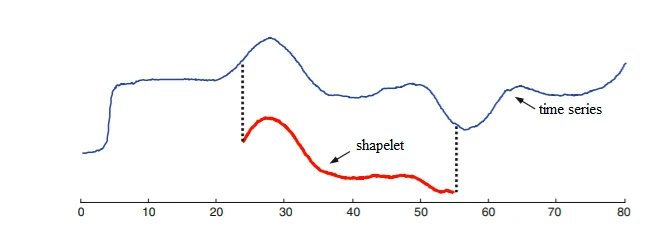
Fig. 4. Shapelets are small pieces of time series associated with a class. The distance between the time series (blue) and the shapelet (red) is the shortest distance between the shapelet and any part of the time series (here indicated by the dots). Taken from [14] with permission from Alexandra Amidon.
The main difficulty when using shapelets is that it can be hard to know which shapelets to use. One possibility is to manually craft a set of shapelets, but this can be quite difficult and time consuming. A better solution, if possible, is to automatically select shapelets. The way to do this best is an active field of research to a problem that is quite tricky due to the enormous amount of possible shapelets (see [15], section VI, and [13] for a good overview).
Another problem is really bad time complexity (how the execution time scales with the data): O(n2l4), where n is the number of training samples and l is the shapelet length [13]. This means that doubling the training data leads to a 4-fold slowdown and doubling the shapelet length leads to a 16-fold slowdown.
Model ensembles
Another approach has been to create model ensembles. “Collective of Transformation-Based Ensembles” (COTE) [16] from 2015 and its development HIVE-COTE from 2016 [17] are ensembles (collections, see below) consisting of many different models. COTE managed to increase the accuracy with 8% on the UCR/UEA datasets vs DTW+1-NN [13], which was the best of all algorithms tested. HIVE-COTE then significantly outperformed COTE and is the best algorithm to date that is not a neural network.
An ensemble is a collection of models each with its own classification, from which you pick the most common one. This works well if models have good enough accuracy and the errors that each model makes is different. For example, having three uncorrelated models with 90% accuracy each, for a given time series there is a 0.1*0.9*0.9 = 0.081 chance of one model giving the wrong answer, a 0.1*0.1*0.9 = 0.009 chance of two models giving the wrong answer and a 0.1*0.1*0.1 = 0.001 chance of three models giving the wrong answer. Taking the majority vote, the ensemble would give the wrong answer only in the latter two cases, representing 0.009 + 0.001 = 0.01 = 1%. Thus we have increased the accuracy of the ensemble to 99% vs the 90% of the single model.
An important factor for an ensemble is the degree to which the algorithms are uncorrelated (produce errors in different places). If all algorithms are totally correlated, they will produce the same results and so the ensemble will have the same accuracy as the individual algorithms. The authors of COTE noted that several of the 35 employed algorithms were minor variations of the same team (e.g. 50% worked in on auto-correlation and spectrum features). HIVE-COTE tried to address this by creating a hierarchy whereby all the algorithms were first grouped by type (DTW-based, dictionary-based, etc). Each major group first produced a joint classification and that was then entered into the ensemble classification. In this way they were able to avoid that the ensemble was dominated by one group of correlated algorithms, with the result of improved performance.
The biggest problem with COTE and HIVE-COTE is that several of the models rely on the shapelet transform and hence suffer from very bad time complexity, meaning that they take ages to run on a big dataset [13]. For this reason, the community has looked for faster alternatives. Another ensemble, TS-CHIEF, although not having higher accuracy than HIVE-COTE, is one such choice [18].
With so many models it is also very difficult to understand why the models classify the way they do. Interpretability is tremendously important. For example, it is not enough for a physician to say that you belong to the class of people for which there are little chances of survival in case of contracting corona virus and therefore we will not give you treatment.
Dictionary-based approaches
A third popular collection of techniques is called dictionary-based [13]. Basically, a dictionary is a list of words where you look up a word to retrieve something, e.g. an explanation of the word or the number of occurrences of the word in a text. So for instance one could classify a text as belonging to a type of field (e.g. sports vs law) by comparing the occurrences of different words.
But how does this apply to time series classification? Well, there are several ways to construct dictionaries for time series. One could use the shapelet approach above [12, 15] to count the number of times in a time series where there is a match between the shapelet and the time series. In such a dictionary the shapelet takes the place of the word and what you retrieve is the number of matches of the shapelet for the time series. An algorithm called ROCKET [19] is currently among the top-performing time series algorithms and does something similar. It has a large number of random kernels (very similar to shapelets) and they calculate for each kernel the percent matches. A simple classifier (logistic or ridge regression) is trained on the dictionary.
Another is the Bag-of-Patterns (BOP) algorithm [20]. It actually underperforms against DTW+1-NN [13], but I include it here because it illustrates the approach well. Like the Bag-of-Words algorithm used for text data, this algorithm counts the number of times a word occurs, only this time the words are created from numbers using a technique called Symbolic Aggregate approXimation (SAX) [21]. A bit oversimplified, you first split the time series into a number of larger time segments and normalize. Next you define intervals of the signal (y) value and assign a letter to each (e.g. A: <-0.3, B: -0.3 to 0.3, C: >0.3). You finally cut each segment into small pieces, calculate the mean for each piece and translate it to one of the letters (A, B, C in this case). In this way each segment consists of a string of letters, e.g. ABBC. You can then summarize the number of occurrences of each string into a dictionary, which can be used for classification.
Other dictionary approaches have been more successful, in particular an algorithm called BOSS [2]. It works similarly to BOP, but instead of translating the normalized original signal into words it works by Fourier transforming the signal into frequency space, low-pass filtering it and translating it into words using two algorithms called SFA and MCB. This has the effect of reducing noise. Furthermore, it creates an ensemble of different models that vary by the amount of low-pass filtering and the word length. In a comparison between many different algorithms on datasets from UCR/UEA, the BOSS algorithm was among the best, and is much faster on big datasets than COTE (complexity: O(n2l2)) [13].
One of the main reasons why dictionary based approaches work well is that the translation into words make them robust to noise.
Interval-based classification
The most typical interval-based algorithm would be the time series forest [22], a type of random forest. A forest is a collection of decision trees. Each decision tree is a machine learning model that takes a data point and assigns a class based on the value of its variables, as shown in Fig. 5. By creating a number of trees, each which gets to see a different part of the data, you end up with an ensemble of different tree classifiers (i.e. the forest), each possibly producing a different classification (since it has been trained on slightly different data). You then follow the usual ensemble procedure and choose the most common prediction as your final prediction.
Fig. 5. Decision tree example. A decision tree takes a data point, in this case a game, which can be characterized along a number of different dimensions (here 3: a. type of game, b. multiplayer via Wifi, c. works for 2 players). By traversing the tree, we end up at a purchase decision (as illustrated by the dashed line, a computer game that does not allow for game play via Wifi will not be bought). In a random forest ensemble the aim is to produce trees with different structure whose errors are uncorrelated.
The special thing of a time series forest is that you divide your time series into n distinct intervals and for each interval you calculate the 3 values mean, standard deviation and slope [21]. Thus you end up with 3n variables that you input into the model. One of the tricks is to find how you split your time series into intervals. The performance of time series forests are not as good as BOSS or COTE [13].
Deep learning
Deep learning models are types of neural networks consisting of several, often many, layers of neurons (See [23] for a simple introduction). They typically contain many more parameters than other machine learning models. Often they consist of a “body” of layers to which data is fed. Whereas early layers represent basic shapes (e.g. a horizontal line in image models), the later layers encode semantically meaningful representations. Thus, the output layer of the body (the “neck”?) should contain what is meaningful and salient in the data. For example, in image classification the body can capture the presence of a car wheel and the neck all the information needed to discriminate between different makes, models and versions. On top of that is a “head” which is a classifier of some sort that makes a classification based on the output of the neck. By working on the neck rather than directly on the image, it is easier for the head to classify data into e.g. cars vs airplanes. In the last decade, deep learning models have become the obvious choice for classification of both images and language. For time series it has only recently gained in popularity somewhat, but still performance on the UCR/UEA datasets is as good as HIVE-COTE [3, 19, 24] despite being much faster.
Ways of training deep learning models
There are perhaps two different ways to train a deep learning model for time series classification (as is the case for many types of deep learning): unsupervised (generative) and supervised (discriminative) [23]. Supervised is what we talked about above. This is where you train the model to generate the correct classification. One problem with this approach is that the classes contain only little information (for a two-class problem only 1 bit of information), whereas the time series contains a lot more and the model has many parameters to be tuned. With generative learning one instead trains a model to output a whole time series. One approach is the auto-encoder, where one replaces the head with an inverted body. Since the neck contains a distillate of the information of the time series, by passing it through the inverted body one should be able to regenerate the original time series. Since the time series contains more information than the class, the network is trained to capture all the information in the neck that is needed to regenerate the time series well enough. Having performed basic training, one can then remove the inverted body and replace it with a head that you can then train on the classification task at hand. TimeNet is an example of this approach [25].
Model types
There are many different types of deep learning models. Since the field moves quickly in this area, I will not go into detail concerning the specific architectures. They are generally one-dimensional, and often are causal (meaning that a value only depends on historical values, not future ones). Previous models were often of a type called recurrent networks, but recently the most successful architectures have been so-called convolutional networks. Some of the architectures that perform at least as well as COTE are ResNet [3], Fully Convolutional Networks [3] (that can handle time series of different length), multi-scale convolutional neural networks [3] and InceptionTime [26].
Lack of data problem
Lack of data might be the main reason why training from scratch of deep learning models tailored specifically for time series data has not previously been able to beat the more traditional algorithms on the UCR/UEA datasets. This is suggested by the big discrepancy between time series and image dataset sizes [6] as well as the improvement of classification accuracy with deep learning model ResNet when synthetic data is added to the smallest datasets in UCR/UEA [27]. We end this section with some approaches to tackle the data problem.
ROCKET [19] is a model (not a typical neural network but with many similarities) that has taken the radical approach of randomly setting the weights of the model body without training. It chooses a large collection of different weights of various magnitudes in the hope that they will be able to capture a large variety of patterns in the data. This model has very similar performance to HIVE-COTE.
Another approach has been transfer learning. TimeNet [25] is created specifically to serve as a pretrained and publicly available time-series specific deep learning network for common use. There is also the transfer learning from image models mentioned above.
Finally, a third approach has been to increase the amount of data by producing artificial data. A good overview is given in two articles by Iwana and Uchida [6, 28]. This technique is called data augmentation and merits a blog post of itself, but one of the approaches has been to take two time series from the data belonging to the same class and mixing them. The secret of the sauce is how to do the mixing properly. As when calculating the distance between time series, one needs to find out which pairs of data points in two series are corresponding. So one approach has been to use DTW to pair up the time points of two different series and then take an average of the paired data points. Currently data augmentation is not an established practice in time series classification whereas it is in image classification [6, 28], but this is a field that will become much more important in the future. It will probably boost the performance of most algorithms, but especially more complex models such as deep learning models.
Last words
Above I have tried to give an outline to the enormous field of time series classification. For readers, whether you do or do not know machine learning, I hope that the above can guide you and set expectations should you start a time series classification project. One suggestion would be to find a dataset from UCR/UEA [1] that is similar to yours in order to get an idea of what could be achieved. If you know how to code and want to try out an algorithm, I suggest you download a dataset from UCR/UEA and try out a basic algorithm such as DTW+1-NN ([29] for a Python implementation) or one of the algorithms that perform well on a suitable UCR/UEA dataset. There are many algorithms out there, and many of the articles reviewed above come with source code from Papers with code [30]. Note however that the code is written by researchers and not professional developers, which means that the code might require some tweaking.
Working on a machine learning project is similar in many ways to working on a code development project. It is great to try things out on your own. Still, just like most code development work sooner or later needs developers, the same goes for machine learning projects.
References
- UEA & UCR Time Series Classification Repository. timeseriesclassification.com.
- Schäfer, P. (2015) The BOSS is concerned with time series classification in the presence of noise. Data Min Knowl Discov 29, 1505–1530.
- Wang Z. et al. (2017) Time Series Classification from Scratch with Deep Neural Networks: A Strong Baseline. IJCNN 2017: 1578-1585.
- Cover T.M., Hart P.E. (1967) Nearest neighbor pattern classification IEEE Trans Inf Theory 13(1)21–27.
- Müller M. (2007) Dynamic Time Warping In Information Retrieval for Music and Motion 69-84
- Iwana B. K., Uchida S. (2020) Time Series Data Augmentation for Neural Networks by Time Warping with a Discriminative Teacher. arXiv:2004.08780v1.
- Sultana F. et al (2018) Advancements in Image Classification using Convolutional Neural Network 4th Int Conf Res Comput Intell Commun Netw (ICRCICN), Kolkata, India, 122-129
- Krizhevsky A (2009) Learning Multiple Layers of Features from Tiny Images.
- Imagenet. www.image-net.org.
- Wang Z., Oates T. (2015) Imaging Time-Series to Improve Classification and Imputation. In: 24 Int Joint Conf Arti Intell.
- Dau H.A. et al (2019) The UCR Time Series Archive IEEE/CAA J Autom Sinica, (6) 6, 1293-1305
- Ye L., Keogh E. (2009) Time series shapelets: a new primitive for data mining. In KDD ’09: Proc 15th ACM SIGKDD Int Conf Knowl Discov Data Min.
- Bagnall, A. et al. (2016) The great time series classification bake off: a review and experimental evaluation of recent algorithmic advances. Extended Version. arXiv:1602.01711.
- Amidon A. (2020) A Brief Survey of Time Series Classification Algorithms Towardsdatascience.com.
- Gupta A. et al (2020) Approaches and Applications of Early Classification of Time Series: A Review arXiv:2005.02595v2.
- Bagnall A. et al. (2015) Time-Series Classification with COTE: The Collective of Transformation-Based Ensembles. In IEEE Trans Knowl Data Eng., 27, (9) 2522-2535.
- Lines J. et al. (2016) HIVE-COTE: The Hierarchical Vote Collective of Transformation-Based Ensembles for Time Series Classification. In IEEE 16th Int Conf Data Min (ICDM), 1041-1046.
- Shifaz A. (2020) TS-CHIEF: A Scalable and Accurate Forest Algorithm for Time Series Classification. Data Min Knowl Discov 34, 742-75.
- Dempster A., Petitjean F, Webb G.I. (2020) ROCKET: exceptionally fast and accurate time series classification using random convolutional kernels. Data Min Knowl Discov 34, 1454–1495.
- Lin J.et al (2007) Experiencing SAX: a novel symbolic representation of time series. Data Min and Knowl Discov, 15(2):107–144
- Lin J., R. Khade, and Y. Li. (2012) Rotation-invariant similarity in time series using bag-of-patterns representation. J Intell Inf Sys, 39(2):287–315
- Deng et al. (2013) A time series forest for classification and feature extraction. Inf Sci 239, 142-153.
- Kaggle Intro to Deep Learning.
- Fawaz H.I. et al (2019) Deep learning for time series classification: a review Data Min Knowl Disc 33, 917–963
- Malhotra P. et al. (2017) TimeNet: Pre-trained deep recurrent neural network for time series classification In: ESANN 2017 proc, Eur Symp Artif Neural Netw Comput Intell Mach Learn Bruges (Belgium).
- Fawaz H.I. (2020) InceptionTime: Finding AlexNet for time series classification Data Min Knowl Discov 34 1936–62
- Fawaz H.I. et al (2018) Data augmentation using synthetic data for time series classification with deep residual networks arXiv:1808.02455.
- Iwana B. K., Uchida S. (2020) An Empirical Survey of Data Augmentation for Time Series Classification with Neural Networks. arXiv:2007.15951v1
- Regan M. (2018) Github code repo: K-Nearest-Neighbors-with-Dynamic-Time-Warping
- Papers with code – time series classification

Fredrik Edin
Konsult Machine learning & data science
Vill du veta mer om oss på Developers Bay?

I learned React in 3 weeks and so can you!
Let’s start right away with the premise:
If you have few years of experience in software development, you can learn any programming language or framework in 3 weeks.
In 6 to 12 months no one will ever suspect that this is not your main language. Not your coworkers, not your manager, not even your own mother! Any language you pick today can be added as a skill to your LinkedIn profile 3 weeks from now!

Disclaimer
While the target audience for this article is mainly front-end developers with at least few years of experience, it is not really a technical one. Despite the abundance of software terminology and abbreviations, it is in fact a motivational one. I encourage you to read through it and skip the parts that make no sense to you. Happy reading!

For 10 years I’ve been doing Android almost exclusively. OOP was my religion. I had Clean Code under my pillow and a picture of Uncle Bob on my wall. Sure, I’ve switched from Java to Kotlin in 3 days, but Kotlin is pretty much the same, just fancier, synthetic sugar without calories. And sure, I’ve written some scripts to batch rename files or automate birthday wishing to my mom, but never Java Script, not even a single line. That would be blasphemy. Utter chaos. Never even did Right Click -> Inspect Element. The web is a black box to me. No hablo inglés.

In this article we’ll go through 5 specific steps that will make you an “expert” in the language you choose to learn. Expert of course has quotation marks, but it is also not an over statement. You will create a decent solution. It will look like is done by an expert. It will feel like is done by an expert. Why you may ask? Check this photo below:
Now, you don’t need to be an architect or an interior designer to understand that this is not a proper door placement, it is a disaster waiting to happen. Similarly, you don’t need to be an artist to appreciate a beautiful piece of art. Even if you don’t know details about light, shapes, color, composition and perspective, millions of years of evolution shaped our brains to appreciate the beauty of aesthetics. It is embedded in nature. It is universal.
So, if you ever wrote a piece of code that you thought it is beautiful in your primary language, you will write somewhat equally beautiful code in the language you will learn. Not just that, you will also be able to recognize beautiful code when you are googling stuff. You will be selective in your copy pasting.
Before we dive right into the 5 steps, let us first tell:
A short backstory
Few months ago I started my own company. As an entrepreneur, the most important decisions you will make is the choice between I will do this myself for a fraction of the cost and I will pay for a service. Few examples:
- Build your own website or use Wix
- Deploy your own backend or use Firebase
- Do your own paperwork or use Red Flag
- Create your own content or use GPT-3
While #1 and #2 are a matter of preference and largely depend on your existing skill set, #4 is a human’s denial that creativity is related to consciousness and there is no way that an algorithm can easily replace us, #3 is something absolutely no one wants to do!
Your idea is going to change the world and you cannot change the world if you are stuck filing in the receipt for the new PS5 console for your kids as a business purchase. You don’t want to learn the tax system, so you hire an accountant to deal with all that.

Soon, you discover that accountant also deal with expensive, clunky legacy systems that require a great deal of manual work. Pasting stuff in excel sheets, organizing folders on cloud storage, exporting reports in obscure formats. Naturally, you want to help with all of that, you want to provide a solution that will make life a bit easier for your accountant and find your first client in the process. Business is fun!
1. Find your motivation
The backstory leads us to step number one: Find your motivation. This is imperative for your learning process. Following basic tutorials or reading articles about best practices is a good place to start, but in order to truly progress, you need to get your hands dirty working on a real life problem, providing a real life solution.

So, go ahead and find your motivation. Your pet project that needs a revamp, that app your cousin insists is going to be the next unicorn, a simple tool to connect with your grandma that features two big emojis and a parallax header of you being little and eating her meals, a beautiful app featuring a map and a gallery of misplaced electric scooters,… Anything works.
Not motivated by random examples? Just ask a person you interact with about a problem they have and try to solve it with software. Make someone redundant. Have fun.
Still nothing? There is an app for that! You can even build an app idea generator yourself.
Bonus step: Find your time
Motivation is nice and all, however you do need to find time to express yourself creatively. If your partner or child is screaming for attention while you navigate tight deadlines, maybe learning a new language will add fuel to the fire. But on the other hand, you get ahead in life by over promising and hopefully over delivering, so feel free to skip this step, who needs time!
2. Understand your motivation
Congratulations, you found your motivation and have a nice thing you can build. Now go ahead and light a scented candle, play some relaxing music, assume a meditative posture and look deep inside yourself to understand why are you doing this.

Few common reasons:
- You are bored during the pandemics
- You feel like you are lagging behind with your skillet and feel a need to stay relevant
- You are helping out a family member, a friend or an associate
- You secretly hope that this will scale one day, you will become ultra rich and beat the CEOs of tech companies in their quest to colonize the solar system
- You accept the reality that no human will ever need to code 10-ish years from now and you want to enjoy it while it lasts
Understanding the reason behind your willingness to learn a new language or a framework will help you tremendously in making the right decisions. It will do this by revealing the constraints.
For example, to solve the problem my accountant was facing we needed to make a solution that is:
- free or extremely cheap – we try to optimize, not introduce more cost
- multi platform – mobile apps and a web admin tool
- complete – you are trying to solve a problem after all
- doable within a month or two – your time is precious
- not terrible – functional and stable, but not too fancy
And this is how I learned React. Found a reason to build something, understood what needs to be done and chose a framework that covers most of the ground. With little difference between React Native and React JS you can cover the mobile apps and the web admin tool by learning a single language (JavaScript) and single framework (React). You can even take it up a notch and reuse some of the code, but let’s not get ahead of ourselves.
Bonus step: Doubt your understanding
Why React and not Flutter? You can pretty much build web applications with Flutter as well, plus Dart is much closer to Java your old friend than JavaScript. Oh, I just got reminded how much I miss Kotlin. Synthetic sugar overload. So slick. How is Kotlin Multiplatform coming along? What about Ktor? Too many options to choose from. Information overload. We are providing a solution, not waging tech holy wars. Skip this step, React is just fine.
3. Start from the top
Contrary to the popular belief, masterfully expressed in one of the Drake’s songs,

you really don’t need to start from the bottom. You don’t need to understand the basics of JS syntax, the difference between undefined and null or flexbox magic. You don’t even need to dread the lack type safety and consider Type Script. None of that. You only need to add the current year to your web searches. For example: “How to build a React Native App 2020” or “Free web admin templates React 2020” and start from there.
React introduced hooks in 16.8 so goodbye classes! You will never ever have to learn that part of history, unless for some reason you decide to work on legacy code. What about state management? Redux seems like a super boilerplate-y answer to your needs. Add 2020 to that search and you’ll discover a toolkit. Start from there. What about Recoil. Maybe none of that. Hooks will do the job.
What about UI that looks consistent on all platforms? Check out Material or Paper, all apps and all web pages look alike nowadays, no need to reinvent the wheel. Everything that you want to achieve is already done, you just need to put it together. Oh wait, Adobe made Spectrum. By the time this article gets published 20 more frameworks will pop out. It is obsolete already.
Anyways, start from the top and google your way down. It is impossible to understand every single concept you will encounter, every underlying mechanism or language sugar. It is also unnecessary, you have your mission, just search for the thing you are trying to figure out, add the current year to the query and read away.
Bonus step: Go strict
Establish a strict policy. Consider lint warnings as errors. Make your code pretty. Add style hooks to your commits. If you are starting from zero might as well go all in. In the next 3 weeks you will practice expressing yourself in a different manner, it only makes sense to try to express yourself flawlessly. Or it doesn’t. Beauty is in the eye of the beholder. Skip this step, it introduces too much friction.
4. Connect with your inner child
You know who is especially good at learning? Kids. They are awesome at learning. No wonder half of the spiritual advice you can get nowadays is to connect with your inner child if you want to grow and experience the world in a more profound way.
Kids don’t understand the rules of football. They have no idea what offside is. They have a ball and a goal and they kick the ball in the general direction of the goal. Over time they learn all known tricks that increase the likelihood of having the ball in the goal and over even more time they introduce new, previously unheard of tricks that get them ahead in the game.

This is the best way to approach this. Not just this, anything new you want to learn in life. You don’t need to understand everything or discover all the tricks, you just need to aim for the goal and commit to kicking the ball towards it. A little bit closer every day.
Connect with your inner child. Explore your curiosity. Ask questions, but don’t stop when you don’t get a proper answer. Be undefined. Choose what value you want to assign yourself as you go. Don’t let a static compiler check to determine who you are. Play. Have fun. Make bold claims and amend them the next day. By the time you are close to a shooting distance, you can scissor kick the ball, publish your app, update your LinkedIn profile with the new skill and write a blog post explaining how you shot for the stars and landed on the moon.
Bonus step: Scrape everything and start over
OK, don’t do that just yet. Scrape everything and start over. Your code is bad. It will never scale. Your view layer is tangled with your business logic. You don’t even downscale the images you upload to your storage and will soon reach the quota limits of your free plan. People will hate it. There are much better solutions out there. You were right from the start to doubt yourself. Again with the overthinking. Is this a part of the normal development process? Silence the internal critic and skip this step as well, you made something awesome!
5. Go public
You have to. Going public is the best way yo make a commitment. You don’t have to publish the app on the App Store or Google Play and go through cumbersome submission processes, but go public somehow. Send an email to your friends asking for feedback, write a semi-humorous blog post to justify your efforts, push your code to GitHub, answer a question on Stack Overflow with your new gained expertise, make a PR on the library you used, motivate your surrounding to learn something new as well,…

Get creative, contribute somehow to the big data, make it easier for the algorithms to understand how humans learn, they may suggest improvements in the future based on your experience.
You may feel a strong urge not to go public, especially if you did not manage to produce something tangible in these 3 weeks. But, before you go ahead and associate work with measurable output, ask yourself these two questions:
- What did you learn?
- Did you have fun?
If you learned something you did not know before and you had fun doing it, than you’ve successfully completed this tutorial and you’ve proven yourself that what sounds improbable is in fact quite possible. You are awesome, give yourself some love
A short summary
That’s all. Well, probably there is lot more to it, but this is the level of insight you can expect from a random blog post on the Internet about learning something that differs only slightly from what you already know. Not a lot of new information, nothing too profound or insightful.
Just a gentle reminder that you are not defined by your past choices. You are not limited by your existing knowledge. You are not stuck with a technology. You are free. You can learn pretty much anything at any time and have an amazing time doing it.
So, go ahead and do it!
Medo is an entrepreneur with extensive experience in software development and team leadership. He engages in projects ranging from hacked together proof of concepts to distributed solutions serving millions of users.
Medo loves sharing, he believes it is the optimal way of learning. He often speaks at events and social media on topics varying from technical solutions to inspirational talks. His enthusiasm for exchanging knowledge goes from vegan food recipes and body hacks, to quantum physics and the origin of the Universe.
At the moment, he is pursuing a dream to create a better workplace for everyone, helping individuals and organizations embrace a more mindful and heart based approach to leadership. He would love if you connect with him on LinkedIn.
Ivan Dimoski
Android expert & Mindful leader